Thursday, October 20, 2011

How To Pack an Apple

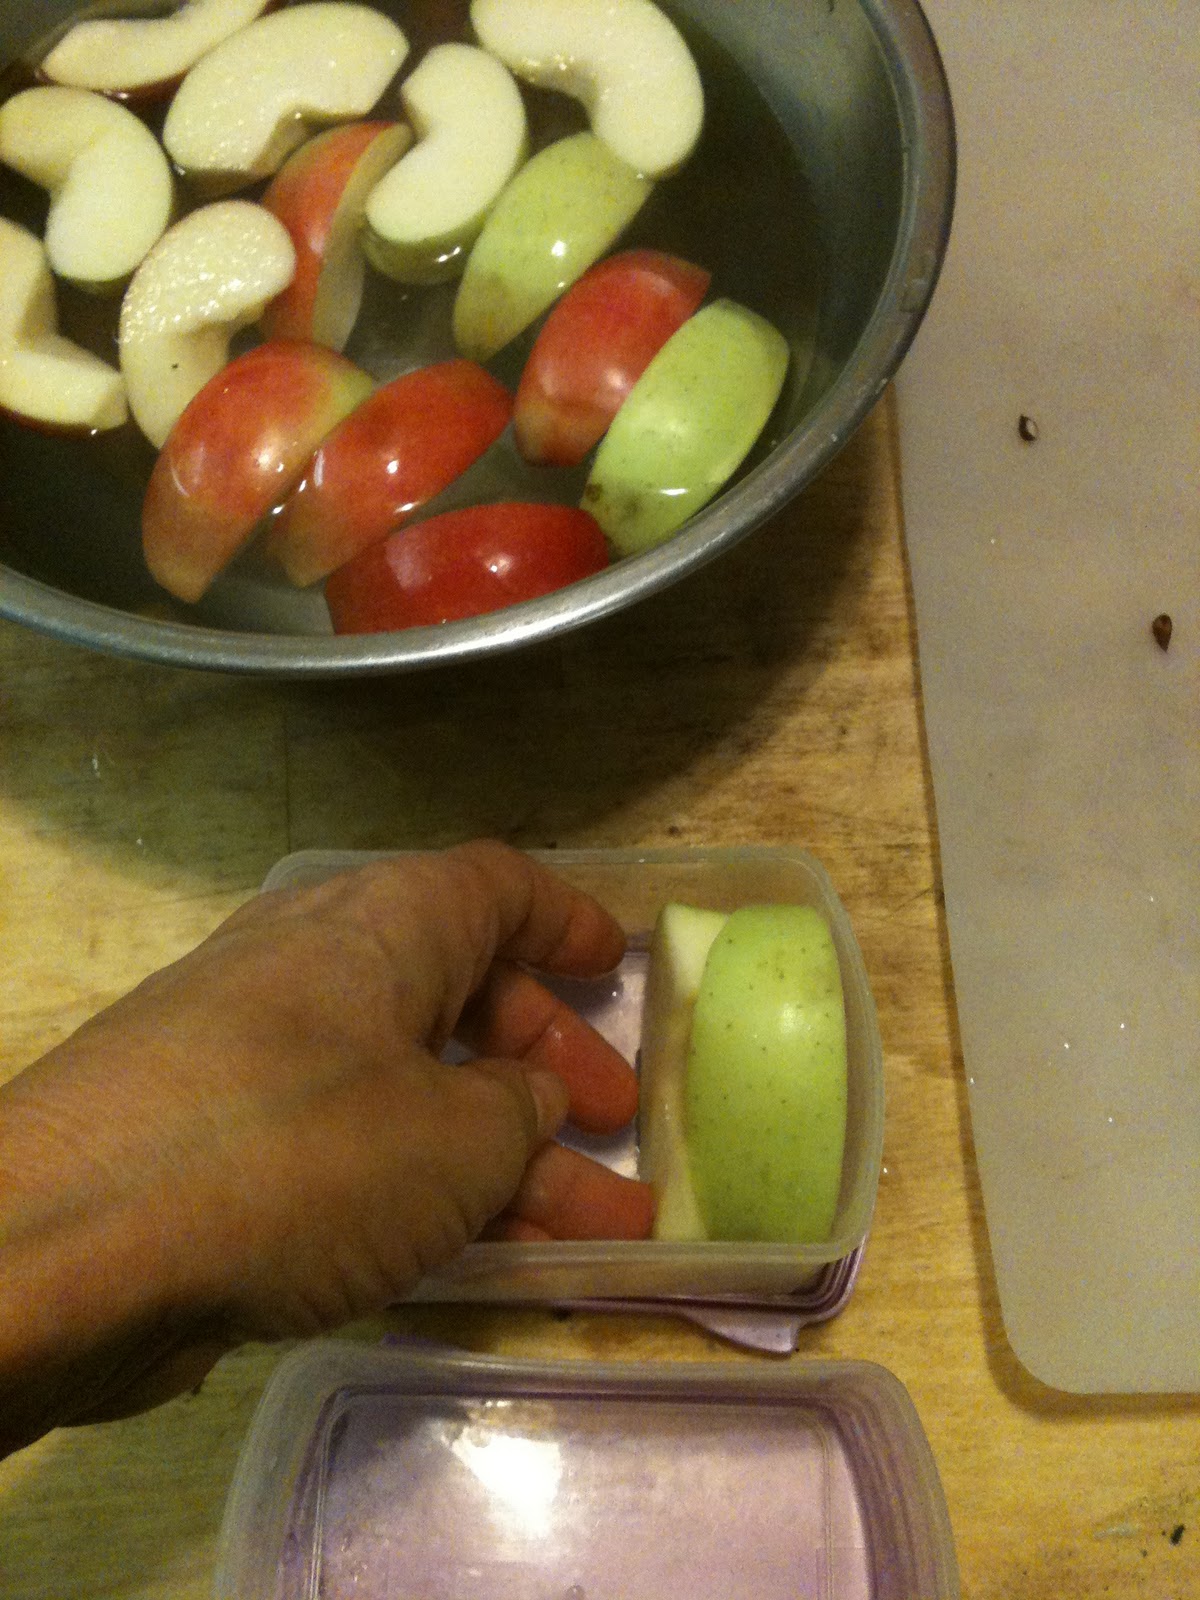
For some reason, my kids prefer to have apples cut up. If it's cut up, they'll eat it; if it's whole, it comes home uneaten and travel weary. It makes sense, though: Kids enjoy being able to share slices with their friends. One fun way to pack an apple is the stripey way. It is simple to do and has a big visual impact--plus, you get to eat two different kinds of apples! For two people, use one red and one green or yellow apple. Here I have used a Fuji and a local Yellow Delicious. Cut them into eighths and put them in a bowl of cold water to retard browning. (Some people add salt or lemon juice, but I don't.)

Begin with a pair of one color, in this case green. Set them in so the top slice is against the edge of the box. Now add a pair of the next color, and continue alternating as far as your container goes. (These are two of the small containers that come in the Fit & Fresh system.) When your box is full, add one more slice to the top row. In this demonstration, there are three slices on the bottom row and four slices on the top. That will leave two extra slices for the cook! I love when it works out like that ; )

Tuesday, October 18, 2011

Yes, You Can--Beans!

Home-canned beans from Potenza Organic farms. Yum!

One of my kids' favorite lunches is quesadillas or chips served with a dip made of salsa mixed with black beans. I like to use the local organic beans in my pantry, but beans do take time to cook, even in the pressure cooker, and the quesadilla lunch is one I like to make on the fly. Then one day I spoke to my friend Ellen at Regional Access, a local-foods distributor. Ellen has been buying local organic beans and canning them herself. (Did you know you could do that? I didn't know you could do that.) What a great idea! You can have local, organic beans for less than the cost of buying canned beans, and what a convenience. It takes the same amount of time as just cooking beans!

All you need is a pressure cooker large enough to hold canning jars, and, of course, beans. (If you don't have a pressure cooker, consider buying one. They save time and energy. It will expand your repertoire tremendously.) Any pressure cooker large enough to hold jars will work. Mine is a 5-quart pressure cooker, and it holds pint jars or smaller. Most new pressure cookers come with a round, flat metal insert you put in the cooker to hold the jars up off the bottom.

Dip made from beans and salsa, plus organic corn chips. Apples, cookies and grape gelatin not pictured.
If you have never canned, it would be a good idea to look up more information about proper procedure. I can't go into that here. It is pretty easy, though, and satisfying. To pressure-can beans, soak the beans overnight, then cook them for about 1/2 an hour,  to make sure they are heated through. (I won't get into the "salt-or-no-salt" debate--just do as you see fit.) Pack the hot beans into the hot jars, put the jars in the pressure cooker, then process at 10psi for 60 minutes for pint jars. My jars held one cup each--that's half a pint--but I went ahead and cooked them for the full hour anyway, just to make sure the beans were soft enough. They came out perfect! It's great because you don't have to worry about the beans on the bottom of the pot sticking or burning--they all cook evenly and perfectly. Use what you need at the moment and let the other jars cool so you can put them away for another day--your "leftovers" are already packed and ready.

Thursday, October 6, 2011

The Envy Factor

My friend Matt packs lunch every day for his newly vegetarian daughter. It is an adventure. He has been posting the lunches on Facebook. They are not at all fancy, but they are appealing, and many of the elements he makes in advance, so his mornings are easier; in fact, this morning we met on the way in to school 20 minutes late--their alarm hadn't gone off, and we had houseguests. But all the kids had lunches. My point is that even though Matt is preparing lunches that are different from the norm, and even though they are simple to make, every day at lunch other kids stop what they are doing to watch his daughter unpack her box and open all the containers. Her lunch is an event.

When you are packing lunch for someone on a special diet, the "special" is an important factor. Instead of "poor me, I can't eat that," go for "lucky me, I get to eat this!" It does not have to be labor intensive to succeed, although it certainly could be if you are so inclined. Mainly, it has to look appetizing and be something your child is excited about eating. Colorful and fresh go a long way in this department.

Enviable lunches don't have to be hard. The extra labor involved is usually a matter of retraining your brain to plan ahead, and the more you do it, the easier it becomes, until you are planning ahead on the fly. Adjust it to suit yourself. I like packing bento boxes with a couple side containers, so my kids get the composed meal effect. Matt packs a bunch of individual containers all at once a couple times a week, so his daughter gets the "opening presents" effect when they are unpacked. What would work best for you? What containers could you keep on hand? What foods make you feel special?

Tuesday, October 4, 2011

Local Lunch

Black bean and cheese quesadillas, broccoli, hakurei turnips; green and red apples wedges; steamed delicata squash.
At a food conference last week, I was surprised to learn that, even among foodies, there is a lack of knowledge about how much fossil fuel goes into food. There is all the fuel involved in farm machinery and shipping, of course, but some of it literally goes into the food: Commercial fertilizers and pesticides are made from petroleum, as are artificial colors and flavors. Add to that all the petroleum used in packaging, both in the packages and in the running of the machinery, and suddenly you see that processed food from far away can have a huge carbon footprint.

Fortunately, there is something you can do; in fact, if you are reading this, you are probably already doing it: As much as possible, cook food from scratch, and as much as possible, use local organic ingredients. Changing our eating habits can reduce our petroleum consumption as much as changing our driving habits. The lunch above is a perfect example: The produce was all grown on farms within a mile of our house; the apples are not organic, but the other produce is. The cheese was made in the region. Even the black beans in the quesadilla came from a local farmer. The only non-local element is the brown rice tortillas.

By cooking food from scratch as much as possible, we are doing something important to reduce waste, and probably reduce waist as well. Keep up the good work!

Friday, September 30, 2011

The New Favorite: Taco Rice!

Rice with taco filling and black-olive garnish, shredded lettuce, chopped tomatoes, avocado cubes with lemon and salt.
The Taco Rice tastes just as good as it looks. Thanks so much to JustBento for the inspiration. The kids begged me to send it again, and mom and dad loved it, too. It's my new standby! Even better, it was easy to make a lot of it, then freeze it in portions and just heat it in the morning. We made ours with beef, but you could easily make it with tofu, or tempeh, or black beans, or whatever your family likes. Keep in mind that tofu gets sort of tough and crumbly after it has been frozen, sort of like ground beef, so that would work well with this particular dish.

I had cooked a 5# chub of beef on a cookie sheet in the oven, then put most of it into a ziplock bag before making the taco topping. If you are using ground beef, be sure to drain off all the grease. I separated the grease from the broth and put the broth back into the taco meat. For real tacos, you want the filling somewhat dry so it doesn't drip, but for taco rice, the filling should be wet to help flavor the rice. Wet filling also freezes into more solid blocks. (See my attempt at a recipe below.)

After everything was prepared, I put the bag of ground beef on one side of a clean cookie sheet and portioned the taco topping into the liners on the other side. The only way to cook three meals a day while working is to be efficient in the kitchen. Prefer foods that can be cooked in quantity and put aside for later meals. (Now that I work from home, I have time to cook and to blog about it. Before, I just worked and cooked.)

Once the blocks are frozen, peel off the liners and put the blocks into a bag in the freezer. I made 10 blocks--that's 5 lunches! In the morning, simply reheat as many blocks as you need while you warm the rice. I like this lunch because fellow diners seldom remark "yuck" to tacos--the envy factor is pretty high.

Bag o' beef and lots of little cups of taco topping waiting to go into the freezer.
If you have kids who like different kinds of food, the freezer stash can make it possible to prepare two different lunches with little extra trouble. I already freeze hummus and taco topping, and am thinking of other foods that would freeze well. Teriyaki chicken and green beans? Black bean chili? Macaroni and cheese? If you have an idea about what might be kept in the freezer, please share!

Bento Mom's Taco Meat

one pound cooked ground beef, well drained, broth reserved
one diced onion
one clove garlic, crushed
~one Tbsp ground cumin
~one tsp crushed oregano
~two tsp paprika
~one cup leftover tomatillo salsa
the secret ingredient: one squirt of catsup
(optional: one cup cooked black beans)
salt to taste

Fry the onion and garlic; add the meat and seasonings, plus the reserved broth and a squirt of catsup. Add salsa or water to make it moist; there should be liquid in the bottom of the skillet. Put the lid on, turn the heat down, and let everyone get used to each other. Adjust the seasoning to your own taste. If you don't have tomatillo salsa, add regular salsa, or cilantro, or chipotles in adobo, or just look up a real recipe This is the internet, after all.
Wednesday, September 28, 2011

Kale Rolls from Leftovers

Kale rolls, green beans, Greek yogurt, carrot flowers
Last night we had the simple version of a Lebanese favorite; actually, several Lebanese favorites rolled into one, so to speak. When I was a kid, we were always thrilled to eat grape leaves, cabbage rolls and stuffed zucchini. They were all made with the same stuffing, and the zucchini and cabbage had tomatoes or tomato sauce added. Yogurt was always served on the side. These days rolling is too much work; to make it easy, I just layer the vegetables and stuffing into the slow cooker or pressure cooker. Yesterday when I was processing a mountain of ground beef (more on that next time), I decided to make this for dinner. I had enough cabbage for one layer and enough zucchini for another layer, but absolutely no tomatoes. It still came out great.

While "unstuffed" vegetables is a delicious meal, it is not at all a good-looking meal. There was just enough left to send for lunch, but how to present it in an appetizing way? Luckily I had some kale, although any large leaf would work. I steamed the kale and rolled the filling inside. A whole pot of these would be tedious to roll, but four was no trouble at all. There, that's better.

We happened to have Greek-style yogurt, which is thick, not runny, so it could just go into the silicone cup. The only other thing I had to fill up the box was green beans, which made the lunch a bit monochromatic, but a scattering of carrot flowers saved the day. The carrot flowers are very easy to make and kids love sharing them.

The chef in the YouTube video uses a citrus tool to make the channels; you can also do as I do and cut small grooves with a sharp knife. His way is easier, though ; )

Monday, September 26, 2011

News Flash! Frozen Hummus a Big Hit!

Hummus with roasted red pepper, steamed spinach with sesame oil and soy sauce, hakurei turnip, steamed green beans, carrots, lettuce, olives; home made applesauce with frozen raspberries; melon chunks
The frozen hummus has been working out great. I have been taking the cubes out of the freezer at dinner time and popping them back in to the silicone liners to thaw. By the time we're washing dishes, it is thawed enough that I can put it in a bowl and stir in other ingredients, if I want. Tonight I added roasted red pepper, just to change it up. This lunch was already easy to make the night before, and the frozen hummus makes it super fast.

I read about Japanese Taco Rice yesterday on Just Bento, one of my favorite blogs. In this episode, her husband uses couscous instead of rice, but you can see some nice taco filling and toppings. It looks so good! It made me think of my frozen hummus cubes: I bet you could make a lot of taco filling and freeze it in the silicone liners to keep on hand. Then when you have stir fry and salad for dinner, you could quickly whip together a couple taco-rice bentos with lettuce, tomatoes, onions and cheese on the side. Stay tuned for further updates...